A C2C graph shows the whole picture at once, which is wonderful for seeing where you are — and terrible for counting. In the middle of a blanket a diagonal can be over a hundred blocks long, and following it across a chart with your finger is slow. Written C2C patterns solve that by doing the counting in advance. Each row becomes a line like Row 24 ↙ (24): 6 A, 3 B, 15 A.
This guide explains what each part of a written line means, how it maps back to the graph, and how to use the two together.
Anatomy of a written row
Every line in a written pattern from this site has the same structure:
- Row number — counted from the starting corner. Row 1 is the single corner block.
- Arrow — the direction you read the row on the graph. ↗ means from the bottom or side edge upwards, ↙ means from the top or side edge downwards. It alternates every row because you turn your work.
- Shaping in square brackets — what happens at the ends of the row: increase both ends, decrease both ends, or increase at one edge and decrease at the other.
- Block total in parentheses — the number of blocks in the row. Use it as a checksum before you turn.
- Color runs — how many blocks of each color, in working order.
3 A, 2 Bmeans three blocks of color A, then two blocks of color B.
The color letters are defined at the top of the pattern with a plain-English name, a hex color code and the number of blocks of that color, for example A = navy (#1f3466) — 312 blocks. The hex code is there so you can match yarn on screen; the block count tells you how much yarn to buy.
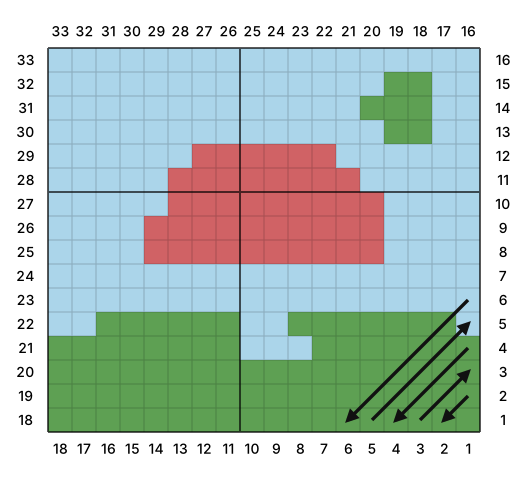 18 × 16 blocks, 3 colors
A = light blue (#abd5ea) — 156 blocks
B = green (#5ea053) — 89 blocks
C = red (#d06265) — 43 blocks
…
Row 1 ↗ [first block] (1): 1 B
Row 2 ↙ [increase both ends] (2): 2 B
Row 3 ↗ [increase both ends] (3): 3 B
Row 4 ↙ [increase both ends] (4): 4 B
Row 5 ↗ [increase both ends] (5): 4 B, 1 A
Row 6 ↙ [increase both ends] (6): 1 A, 5 B
Row 7 ↗ [increase both ends] (7): 5 B, 2 A
Row 8 ↙ [increase both ends] (8): 3 A, 5 B
Row 9 ↗ [increase both ends] (9): 5 B, 4 A
Row 10 ↙ [increase both ends] (10): 5 A, 5 B
Row 11 ↗ [increase both ends] (11): 3 B, 1 A, 1 B, 6 A
Row 12 ↙ [increase both ends] (12): 4 A, 1 C, 2 A, 1 B, 1 A, 3 B
Row 13 ↗ [increase both ends] (13): 3 B, 4 A, 2 C, 4 A
Row 14 ↙ [increase both ends] (14): 4 A, 3 C, 3 A, 4 B
Row 15 ↗ [increase both ends] (15): 5 B, 2 A, 3 C, 2 A, 1 B, 2 A
Row 16 ↙ [increase both ends] (16): 2 A, 2 B, 1 A, 4 C, 2 A, 5 B
Row 17 ↗ [inc at bottom edge, dec at top edge] (16): 5 B, 2 A, 4 C, 2 A, 2 B, 1 A
Row 18 ↙ [inc at bottom edge, dec at top edge] (16): 1 A, 2 B, 1 A, 5 C, 2 A, 5 B
Row 19 ↗ [decrease both ends] (15): 4 B, 2 A, 5 C, 4 A
Row 20 ↙ [decrease both ends] (14): 4 A, 5 C, 2 A, 3 B
…
From words back to the graph
The written pattern and the graph are two views of the same thing. Our test suite actually checks this: it writes the pattern for a graph, reads the text back in, and confirms every block lands on the same square. You can do the same check by eye. Find the row number on the edge of the graph, follow the diagonal in the direction of the arrow, and compare the color runs.
That makes it easy to switch between views. Many people work from the written pattern and glance at the graph every few rows to make sure the picture is building as expected. If something looks wrong on your blanket, find the same spot on the graph, read off its row number, and compare your work with that line of the pattern.
Increase and decrease notes
The shaping note is what turns a list of colors into a blanket of the right shape. A rectangular C2C piece always goes through the same three phases:
- Increase both ends until the diagonal reaches the shorter side.
- Increase at one edge, decrease at the other while the diagonal travels along the longer side. On a wide blanket that is "inc at bottom edge, dec at top edge"; on a tall one it is "dec at left edge, inc at right edge" (mirrored for a bottom-left start).
- Decrease both ends until you finish in the opposite corner.
The last rows of the example look like this:
A = light blue (#abd5ea) — 156 blocks
B = green (#5ea053) — 89 blocks
C = red (#d06265) — 43 blocks
…
Row 30 ↙ [decrease both ends] (4): 4 A
Row 31 ↗ [decrease both ends] (3): 3 A
Row 32 ↙ [decrease both ends] (2): 2 A
Row 33 ↗ [decrease both ends] (1): 1 A
Because the change from one phase to the next happens on a specific row, it is worth highlighting those rows on a printed pattern. Missing the switch is the most common reason a C2C rectangle comes out lopsided.
Tips for working from a written pattern
- Print it. The printed pattern includes a cover page with the color list and yarn amounts, the numbered graph, and the full written pattern. Cross off rows as you finish them.
- Wind bobbins first. Read ahead a few rows to see how many separate sections of each color are coming up. Each run of color on a row needs its own strand — see our guide to C2C color changes.
- Use the row total. Count your blocks before turning. If the count is off, the mistake is in the row you just made.
- Keep the arrow in mind. If you read a row in the wrong direction, the colors come out mirrored along that diagonal. On a symmetric row you will never notice; on a picture it shows immediately.
- Save a copy. Download the pattern as a text file and keep it with your project photos. It is tiny and opens on any phone.
Why letters instead of color names?
Letters keep every line short and are independent of the yarn brand you choose. "3 A, 2 B" is quicker to read mid-row than "3 navy, 2 cream" — and if you decide to swap navy for teal, you only change one line at the top of the pattern. The graph uses the same letters inside the squares, so you can follow either the colors or the letters.
Written patterns for other techniques
The same idea works for row-based crochet. In tapestry mode each line is one row of single crochet, read right to left on right-side rows and left to right on wrong-side rows. In mosaic mode each line tells you which color the row is worked in and where to make single crochet or a dropped double crochet. Fuse bead patterns don't need words — they are placed bead by bead from the chart, one pegboard at a time.
Making your own
To get a written pattern for any picture, open the C2C graph maker, upload your image, set the width in blocks and the number of colors, and scroll to the written pattern below the color list. Copy it, download it as a .txt file, or print it with the graph. If you are using yarn from your stash, choose a custom palette first so the letters match the skeins you already have.