Corner-to-corner crochet — C2C for short — builds a blanket out of little square blocks, each made of three double crochets and a chain-3 space. Because the blocks are square, any picture drawn on square graph paper can become a C2C blanket. The catch is that you never work the graph in straight rows. You start in one corner and work diagonal rows that grow, run across the piece, and shrink again to finish in the opposite corner.
That diagonal trip is what confuses most people the first time they look at a C2C graph. This guide shows exactly how to find each row on the chart, which way to read it, and how the increases and decreases tell you the shape of the piece.
One square = one block
Every square on a C2C graph is one block. The color of the square is the color of the yarn you use for that block. A graph that is 50 squares wide and 60 squares tall makes a blanket 50 blocks wide and 60 blocks tall — 3,000 blocks in total. With worsted weight yarn and a 5 mm hook a block measures roughly 0.8 inches (2 cm), so that graph becomes a blanket of about 40 × 48 inches.
The size of a block depends on your yarn, hook and tension, so make a small swatch of 10 × 10 blocks before you commit to a blanket size. Our guide to choosing a graph size walks through the arithmetic.
Where row 1 starts
Right-handed crocheters normally start in the bottom-right corner; left-handed crocheters start in the bottom-left corner. The very first block in that corner is row 1. Row 2 is the diagonal of two blocks touching it — one to its left and one above it. Row 3 is the next diagonal of three blocks, and so on.
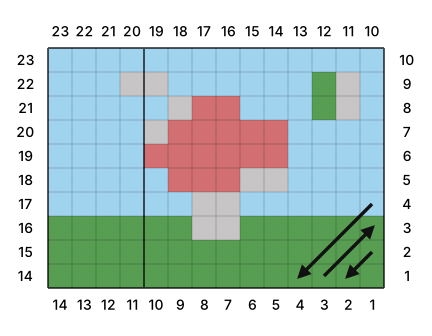
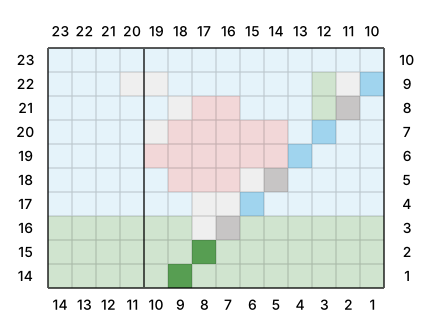
A good C2C graph labels the rows for you. On the charts this site makes, the numbers around all four edges are row numbers, not column numbers: the number next to an edge square is the diagonal row that passes through that square. Every row touches the edge of the graph twice — once at each end — so you can find it by its number on the bottom or left edge and again on the right or top edge.
 Row numbers on every edge
 Row 9 highlighted
Which way to read each row
In C2C you turn your work at the end of every row, so the reading direction alternates:
- Odd rows (1, 3, 5…) are read from the end on the bottom or far-side edge up towards the start-side or top edge — the ↗ arrow on the charts.
- Even rows (2, 4, 6…) are read the other way, from the top or start-side edge down — the ↙ arrow.
When you work a row, read its squares in that order and make the blocks in the colors shown. If a row has 3 blue, 2 white and 7 blue squares in your reading direction, you make 3 blue blocks, change to white for 2 blocks, and change back to blue for the last 7.
The written pattern that comes with every graph does this reading for you. Here are the first rows of the 14 × 10 example above:
A = light blue (#a0d4ee) — 70 blocks
B = green (#579e52) — 42 blocks
C = red (#d26f73) — 16 blocks
D = light gray (#c7c5c5) — 12 blocks
…
Row 1 ↗ [first block] (1): 1 B
Row 2 ↙ [increase both ends] (2): 2 B
Row 3 ↗ [increase both ends] (3): 3 B
Row 4 ↙ [increase both ends] (4): 1 A, 3 B
Row 5 ↗ [increase both ends] (5): 3 B, 2 A
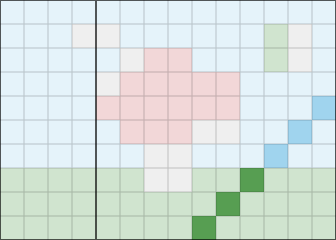
Row 6 ↙ [increase both ends] (6): 3 A, 3 B
Row 7 ↗ [increase both ends] (7): 3 B, 4 A
Row 8 ↙ [increase both ends] (8): 5 A, 3 B
Row 9 ↗ [increase both ends] (9): 2 B, 1 D, 1 A, 1 D, 2 A, 1 D, 1 A
Row 10 ↙ [increase both ends] (10): 1 A, 1 D, 1 B, 1 A, 1 C, 3 D, 2 B
Row 11 ↗ [inc at bottom edge, dec at top edge] (10): 3 B, 1 D, 3 C, 1 A, 1 B, 1 A
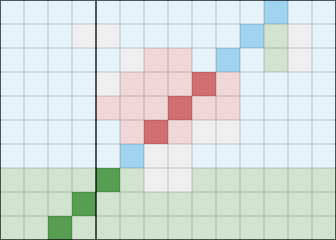
Row 12 ↙ [inc at bottom edge, dec at top edge] (10): 3 A, 3 C, 1 A, 3 B
Row 13 ↗ [inc at bottom edge, dec at top edge] (10): 3 B, 1 A, 3 C, 3 A
Row 14 ↙ [inc at bottom edge, dec at top edge] (10): 2 A, 3 C, 2 A, 3 B
…
The letter is the color from the color list, the number in parentheses is the number of blocks in that row, and the brackets tell you what to do at the ends of the row.
Increasing and decreasing
A C2C piece grows in three phases, and the graph shows all three:
- Increase both ends. From row 1 until the diagonal reaches the shorter side of the rectangle, every row adds a block at both ends. Each row is one block longer than the one before.
- Increase on one side, decrease on the other. If the piece is a rectangle rather than a square, the diagonal now runs along the longer side. It keeps increasing at one end and starts decreasing at the other, so the row length stays the same. On a wide piece you keep increasing along the bottom edge and decrease at the top edge; on a tall piece you increase along the side edge and decrease on the other side.
- Decrease both ends. Once the diagonal has reached both the full width and the full height, every row loses a block at both ends until you finish with a single block in the opposite corner.
 Row 6: increase both ends
 Row 12: inc bottom, dec top
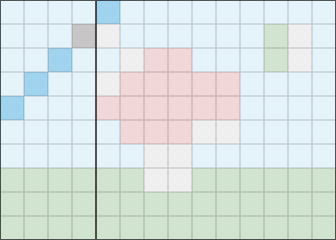 Row 19: decrease both ends
A square piece skips the middle phase: it increases to the full width and immediately begins decreasing. A graph that is W blocks wide and H blocks tall always has W + H − 1 rows. The 14 × 10 example has 23 rows; a 60 × 60 throw has 119.
In the written pattern the shaping is spelled out per row, for example [inc at bottom edge, dec at top edge]. To decrease, slip stitch across the last block of the previous row instead of chaining up for a new block; to increase, chain 6 and start a new block. Your favorite C2C tutorial will show the stitches — the graph only tells you when.
Counting blocks without losing your place
Most mistakes in C2C come from miscounting a long run of one color. A few habits help:
- Highlight the row. Use the row viewer on the graph maker to dim everything except the row you are working on, or mark finished rows on a printed copy with a highlighter.
- Use the bold lines. The thicker grid lines every ten blocks are counted from the starting corner, so a run of 13 blocks is "the bold line plus three".
- Count the row total. Before you turn, check that the number of blocks you made matches the number in parentheses in the written pattern.
- Fix it straight away. A wrong color in the middle of a row is easy to frog now and painful to fix later, because the next row is built on top of it.
Reading a graph that isn't labeled
Some graphs only show colored squares without any row numbers. You can still read them: put your finger on the starting corner square (row 1), then move one step diagonally away from the corner for each row. A ruler laid at 45° across the chart makes a perfect row guide. If you have a picture of the graph, the easiest fix is to recreate it with the graph maker at the same size — you get numbered rows and written instructions in a few seconds.
Common questions
Do I have to start at the bottom-right?
No. You can start in any corner as long as you read the graph consistently. If you start in a different corner, rotate or mirror the graph so that your starting corner is at the bottom. The graph maker has a start-corner setting for left-handers that renumbers the rows from the bottom-left.
Why is my picture mirrored?
C2C fabric looks almost identical on both sides, but if your picture has text, check which side you are looking at. The front is the side facing you as you work odd rows.
What about mini C2C?
Mini C2C uses smaller blocks (one double crochet and a chain-1, or similar). The graph is read in exactly the same way; only the block size and yarn use change.