E-ink (electronic paper) screens are everywhere now: e-readers, smart price tags, weather stations, Raspberry Pi and ESP32 dashboards, digital photo frames and conference badges. They are readable in sunlight and use almost no power — but they can display very few shades. Many hobbyist modules show only pure black and white.
Send a normal photo to one of these panels and it usually turns into a blotchy silhouette. The fix is dithering: converting the image into a pattern of the few shades the panel can show, so your eye perceives the missing grays. This guide walks through the whole process.
Step 1: Know your panel
Before touching the image, find three facts in your display's datasheet:
- Resolution — for example 296×128, 400×300, 800×480. You will resize to exactly this size.
- Color depth — most common types are:
- 1-bit black/white — the majority of small SPI e-paper modules.
- 4-level grayscale — many modules support a 4-gray mode, often with slower refresh.
- 16-level grayscale — e-readers such as Kindle and Kobo.
- Tri-color — black, white plus red or yellow.
- Multi-color — 6 or 7-color panels used in photo frames.
- Orientation — whether the controller expects portrait or landscape data.
Step 2: Crop and resize to the exact resolution
This is the most important rule: resize first, dither last. Dithering creates patterns at the level of individual pixels. If you dither a large image and let your microcontroller or library scale it down afterwards, the carefully placed dots get averaged away and you lose most of the detail.
Crop your image to the panel's aspect ratio, then resize it to the panel's exact pixel dimensions. In DitherImage, you can do this by preparing the crop in any photo editor first, or by using the Pixel size slider to approach the target width — the info line under the controls shows the output resolution.
Step 3: Choose the right palette
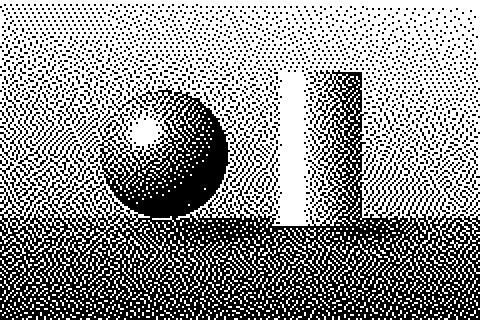
 1-bit, no dithering
 1-bit, Atkinson
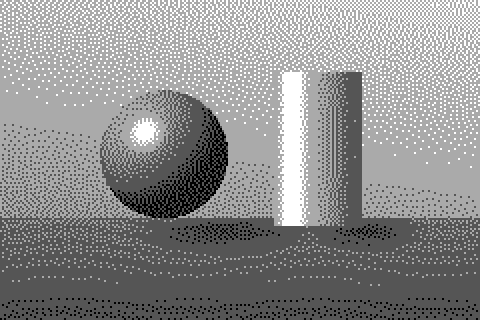 4-gray, Floyd–Steinberg
For 1-bit panels, use the Black & White palette. Without dithering, every mid-tone simply flips to black or white. With dithering, faces, skies and textures survive.
For 4-gray panels, choose the 4-Level Gray palette. Four levels plus dithering look dramatically smoother than 1-bit and are well worth the slower refresh for photos.
For color e-paper, build a palette that matches the panel's actual ink colors. Note that e-paper colors are much more muted than their nominal RGB values — measured palettes give more realistic previews than pure #FF0000 red.
Step 4: Pick a dithering algorithm
For small e-paper screens, the best choices are:
- Atkinson — our favourite for low-resolution e-ink. Because it discards part of the error, highlights stay clean and the image looks crisp rather than noisy. It is especially good for portraits, icons and illustrations.
- Floyd–Steinberg — keeps more mid-tone detail, good for landscapes and busier photos at higher resolutions.
- Bayer (ordered) — produces a regular pattern that looks deliberate and "retro". It is also the safest choice if you update the screen frequently, since the pattern does not shift between similar frames.
Avoid random dithering on e-ink; at low resolution it simply looks dirty.
Step 5: Tune brightness and contrast
E-paper has lower contrast than a backlit screen, and its "white" is really light gray. Dithered images therefore tend to look darker on the panel than on your monitor. Two adjustments fix most problems:
- Increase brightness by 5–15 so that shadow areas keep some white dots.
- Increase contrast to 110–130% to separate the subject from the background.
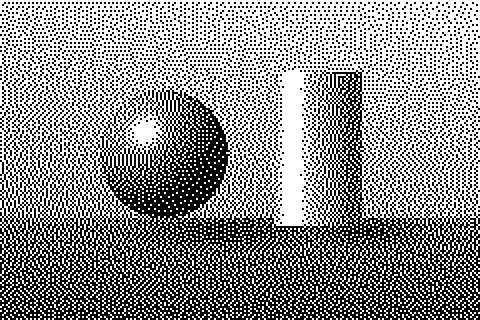 Default settings
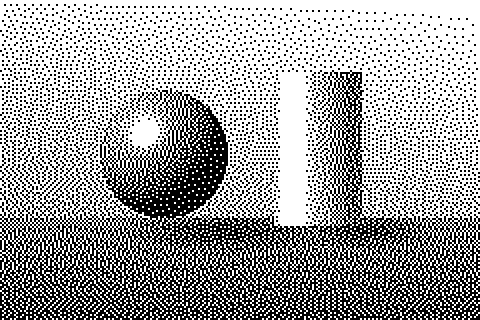 Brightness +12, contrast 120%
If an image still looks muddy, try lowering Dither strength to 80–90%. This reduces the amount of noise in flat areas at the cost of some tonal accuracy.
Step 6: Export and convert to display data
Download the result as a PNG at 1× scale — you want one image pixel per panel pixel. Do not export as JPEG; compression will destroy the dither pattern.
From there, the workflow depends on your platform:
- Arduino / ESP32: convert the PNG into a C byte array with an image-to-bitmap converter, then draw it with your display library (for example GxEPD2 or the manufacturer's driver).
- Raspberry Pi / Python: load the PNG with Pillow and pass it to the panel driver. Because the image is already dithered to the exact palette, the library won't need to convert it again — disable any built-in dithering to avoid double processing.
- E-readers: for custom screensavers on 16-gray devices, dithering is optional, but a 4- or 16-level palette with light dithering can still reduce banding in skies.
Common problems and fixes
| Problem | Fix |
|---|---|
| Image looks like a dark blob | Raise brightness, use Atkinson, check you resized before dithering |
| Pattern looks blurry or smeared | The image was scaled after dithering — export at 1× at exact panel size |
| Diagonal "worm" lines | Enable serpentine scanning, or switch to Stucki/Jarvis |
| Image is inverted | Some drivers treat 1 as black — invert in your code or swap palette colors |
| Ghosting from previous image | A panel issue, not the image — do a full refresh between images |
Summary
- Find the panel's resolution and number of shades.
- Crop and resize to the exact resolution.
- Choose a matching palette (1-bit, 4-gray or custom color).
- Use Atkinson or Floyd–Steinberg for photos, Bayer for a retro look.
- Boost brightness and contrast slightly.
- Export PNG at 1× and convert to your display's format.
Ready to try? Open the 1-bit converter and drop in your image — it runs entirely in your browser.