Thermal printers — the kind used for receipts, shipping labels and those little "Bluetooth sticker printers" — work by heating tiny dots on special paper. Each dot is either black or white. There is no gray.
That means every image you print has to be converted to pure black and white first. Leave the conversion to the printer's driver and you often get a dark, blocky mess. Prepare the image yourself with proper dithering and the same printer can produce surprisingly detailed photos.
Step 1: Find your printer's dot width
Thermal printers are described by paper width, but what you need is the number of dots across the print head. Most use a resolution of 203 DPI (8 dots per millimetre):
| Paper width | Printable width | Dots per line (203 DPI) |
|---|---|---|
| 58 mm | ~48 mm | 384 |
| 80 mm | ~72 mm | 576 |
| 4-inch labels | ~104 mm | 832 |
Some label printers use 300 DPI heads, which gives more dots for the same width — check your model's specifications.
Step 2: Resize to exactly that width
Resize your image so its width is exactly the number of dots in the table — for example, 384 pixels for a 58 mm printer. Keep the aspect ratio for the height.
Do this before dithering. If the printer driver scales a dithered image, it averages the dots back together and re-dithers them badly, which is the main cause of muddy prints.
Step 3: Compensate for dot gain
Heated dots spread slightly into each other, so thermal prints come out darker than they look on screen. Photographers call this dot gain. Compensate before dithering:
- Raise brightness by 10–25.
- Raise contrast to around 120%.
- Simplify or lighten busy backgrounds.
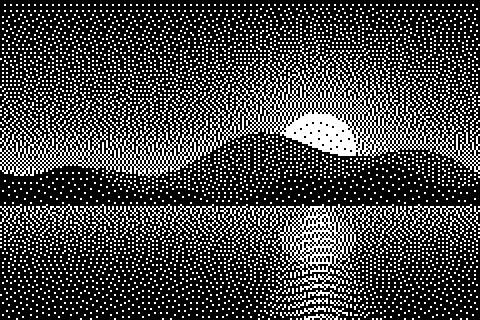 Floyd–Steinberg, default
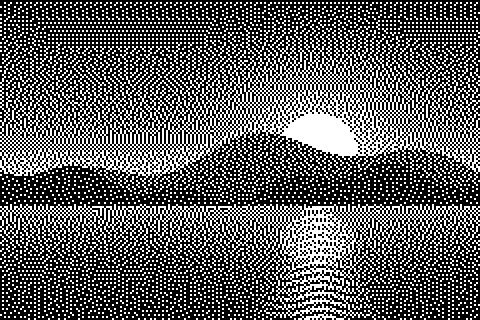 Floyd–Steinberg, brightness +18
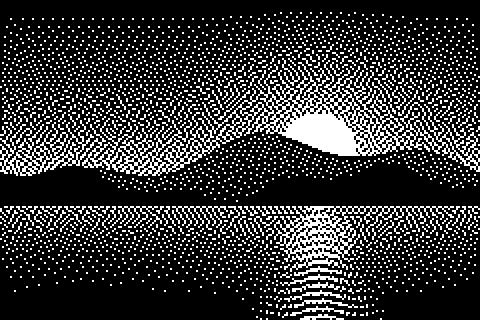 Atkinson, default
Step 4: Choose a dithering algorithm
- Atkinson — usually the best for thermal printing. It throws away a quarter of the error, which keeps light areas clean and prevents the overall image from going too dark.
- Floyd–Steinberg — more tonal detail; combine with a brightness boost.
- Bayer 4×4 — clean, regular pattern that prints very consistently and suits graphic, retro-style images.
- Threshold — best for logos, QR-like graphics and text, where you want solid shapes with no dots at all.
Step 5: Export and print
- Download the PNG at 1× scale.
- Print with scaling set to "actual size" or 100%, never "fit to page".
- If you print from code (ESC/POS raster commands, Python libraries, or a mobile SDK), send the image as-is and disable the library's own dithering.
Tips for specific uses
Receipt logos
Logos look best with no dithering. Use Threshold and adjust brightness until edges are clean. If the logo contains a gradient, use Bayer 4×4 for an even, deliberate pattern.
Photo stickers and journals
For mini Bluetooth printers used in journaling, crop faces tightly and use Atkinson with brightness +15. Small subjects on a plain background print best.
Shipping labels with images
At 203 DPI a 4-inch label has plenty of dots. Floyd–Steinberg gives the most detail for product photos.
Printer settings that matter
Image preparation does most of the work, but a few printer settings have a big effect on photo quality:
- Print density / heat. Most printers let you adjust how hot the print head gets. Higher density makes darker, bolder blacks but increases dot gain. For photos, start one or two steps below the default and compensate with image contrast.
- Print speed. Slower printing gives the paper more time to react and usually produces more even dark areas. If large dark regions look streaky, try reducing speed.
- Paper quality. Cheap thermal paper often has an uneven coating that makes photos blotchy. Branded or "high-sensitivity" paper gives noticeably smoother tones and keeps prints readable for longer.
Why the driver's built-in conversion often looks bad
When you send a color or grayscale image straight to a thermal printer, the driver or app has to convert it to black and white itself. Many do this with a simple threshold or a basic ordered pattern, and they often resize the image at the same time — sometimes after converting it. The result is lost detail, harsh posterization or a fine pattern that turns muddy on paper.
By resizing to the exact dot width and dithering yourself, you control every step: the algorithm, the brightness compensation and the final pixel layout. The driver then simply prints the dots it is given. This single change is responsible for most of the "how did you get such a clear photo?" results you see from hobbyists.
Printing from code
If you control the printer from a script or app, keep the pipeline simple: load the already-dithered 1-bit PNG, pack eight pixels into each byte (most printers treat a set bit as a black dot), and send it with the printer's raster image command, line by line or in bands. Because the image is already at the right width and fully dithered, no further processing is needed. Many open-source ESC/POS libraries accept a PNG directly — just make sure their own resize and dither options are switched off.
Troubleshooting
| Problem | Fix |
|---|---|
| Print is almost solid black | Increase brightness, use Atkinson, check print density setting |
| Image is blurry or blocky | Image was resized after dithering — resize to dot width first |
| Horizontal white streaks | Dirty or worn print head — clean it with isopropyl alcohol |
| Print fades over time | Normal for thermal paper — use "top-coated" paper for longer life |
Prepare your image with the Atkinson dithering tool — no upload needed, and you can export at exactly 1× for your printer.